i haven't been on in a while and with school starting I'm not sure it will get better, but i am excited to say i have a tumblr and a youtube channel now and i will start making a tutorial every week so you can check those out. i may post a few on here but mostly not. so be sure to take a look. i just started so i only have a few videos but that's ok :) also, my tumblr account is up and running so you can follow me if you like what you see! well tah tah for now my friends. love you always :)
youtube: http://www.youtube.com/user/TheDreamingsleepers?feature=mhum
tumblr: http://dreamingsleepers.tumblr.com/
-becca ♥
Thursday, September 30, 2010
Wednesday, August 18, 2010
Easy Coupon Book.
so my mom is crazy about coupons so i decided to make her a little coupon book. its simple and fast and you can change it all you want so lets go,
1. on the far left of your envelope on the side where you would write the address, write the category you would like. for example dairy, snack, meats, etc. 2. starting from the left cut along the crease of the flap until you get to the word. cut up the height of the word, across the top of the word and down the the crease again.
 3. lick the envelope as if you were closing it and tuck the flap inside to make it more sturdy leaving the category tag sticking out and off the envelope.
 4. lay that envelop on top of a new envelop and write the next category where the last tab ended.
supplies:
*envelopes
* tape (scotch and clear)
*card stock (2 sheets, doesn't have to be the same.)
* hole protectors
* string/hemp
1. on the far left of your envelope on the side where you would write the address, write the category you would like. for example dairy, snack, meats, etc.
2. starting from the left cut along the crease of the flap until you get to the word. cut up the height of the word, across the top of the word and down the the crease again. 3. lick the envelope as if you were closing it and tuck the flap inside to make it more sturdy leaving the category tag sticking out and off the envelope. 4. lay that envelop on top of a new envelop and write the next category where the last tab ended.5. cut it the same way.
6. continue to do so until you have all the tabs you want. you can switch which side you start cutting on once you get to the middle of the envelope.
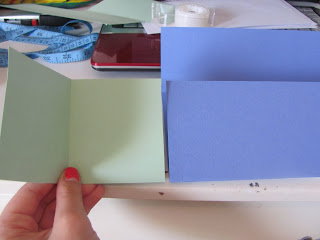
7. then take a piece of clear tape and cut it in half lengthwise and wrap it around each tab to give it strength. 8. take a piece of card stock and fold it over the envelope halfway. then fold the other end to meet in the middle. make sure you don't bend the tabs while doing so.
9. punch holes in about the middle of each flap and put a hole protector on it. 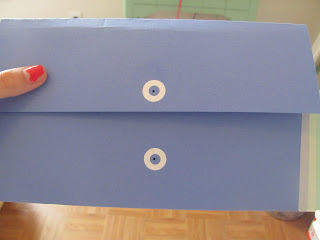 10. take the string and fold it in half. take the fold in the middle and push it through the bottom flap. then take the two ends and thread them through the folded middle staying on the same side. (if that makes any sense.)
 10. then you can take the ends and pull them through the top hole and tie a knot to keep them closed.

6. continue to do so until you have all the tabs you want. you can switch which side you start cutting on once you get to the middle of the envelope.
7. then take a piece of clear tape and cut it in half lengthwise and wrap it around each tab to give it strength.
8. take a piece of card stock and fold it over the envelope halfway. then fold the other end to meet in the middle. make sure you don't bend the tabs while doing so. 9. punch holes in about the middle of each flap and put a hole protector on it.  10. take the string and fold it in half. take the fold in the middle and push it through the bottom flap. then take the two ends and thread them through the folded middle staying on the same side. (if that makes any sense.)
 10. then you can take the ends and pull them through the top hole and tie a knot to keep them closed.
* i used really big envelopes so my card stock wasn't big enough so i,...
1. cut another piece of card stock to match the bottom half and folded it to add about an half inch to the sides.
2. i taped one side of the new card stock to the inside of the bottom flap. repeat on other side.
 3. then i placed a piece of tape on the other end of the new card stock facing me so when i laid it down and pressed on it, it would stick to the other side of the first card stock. repeat on other side.
 4. then i took a piece of tape and cut it in half length wise and used it to secure the visible parts together. i did this on both sides, front and back.
 complete.
 hope you like it and it wasn't too hard to understand. if you have any questions feel free to ask!
3. then i placed a piece of tape on the other end of the new card stock facing me so when i laid it down and pressed on it, it would stick to the other side of the first card stock. repeat on other side. 4. then i took a piece of tape and cut it in half length wise and used it to secure the visible parts together. i did this on both sides, front and back. complete.
 hope you like it and it wasn't too hard to understand. if you have any questions feel free to ask!
blog you later!
-becca ♥
Tuesday, August 17, 2010
Hurray! Tut. Time
soo, its been a while but I'm back with a new tut. this one is a bookmark. i was going through my dresser and found this metal bookmark with a bear holding a candle on the top and i was like ew. and went to throw it out but then i was like hey! i need a bookmark! so i altered it a bit and now i like it :) so lets start,
supplies:
*metal prong bookmark. (probably find one at the dollar store for cheap)
*plastic cover
*paper
*little nick knacks (beads, gems, broken watch pieces, etc)
*glue
*scissors
* and possibly a screw driver if you need to take anything apart for pieces.
1: on the back of your paper trace the plastic cover and cut out the circle.
2: take off the picture already on the bookmark or if that's not possible glue over it and place the paper on top. make sure it fits in without paper hanging off the edge.
3: pick and choose what pieces your going to put inside and place them in the center. be sure that the pieces are small enough that the cover still fits on without allowing anything to fall out.
4: place the cover back on and clamp the prongs onto the cover to hold it in place.
5: get a book. (:
 well i hope you enjoyed and i hope to hear what you think!
-becca ♥
Friday, August 13, 2010
Photo Post.
so i dont have much to say. nothing much has happened lately. i came back from orlando and i went to school orientation but thats really it. therefore, i decided just to post a few photos that i took the last few days and hope you guys enjoy!


 well thats it for now.


 well thats it for now.
 love you guys!
becca (:
Subscribe to:
Posts (Atom)